Satin Ice Shimmer Fondant
Satin Ice recently launched a new product called Shimmer Fondant. I was super excited when I found out I had the opportunity to create a custom piece showcasing this awesome new product.
Satin Ice Shimmer Collection
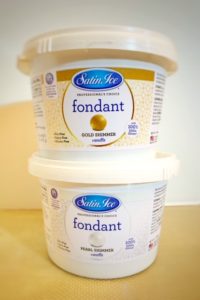
Shimmer Fondant is Satin Ice’s newest product made with 100% edible glitter! What makes this product different than regular fondant? Glitter is mixed right into the fondant which has a beautiful shine and glimmer. While you can still use luster dusts on this fondant, it’s not necessary. Since it has glitter in it, the little crystals capture the light even after decorating your cake.
Satin Ice Shimmer Fondant comes in three different shades:
-
-
- Gold Shimmer
- Pearl Shimmer
- Silver Shimmer
-
Creating Shades of Shimmer
Another great feature of this product is how easy it mixes with Satin Ice’s standard fondant colors. This fondant can also be used to create a marble effect.
Working with Satin Ice Shimmer Fondant
You’ll notice in this photo, I blended Gold Shimmer and Pearl Shimmer to get a lighter shade. It really is beautiful and the edible glitter makes the fondant really shimmer when the light hits it.
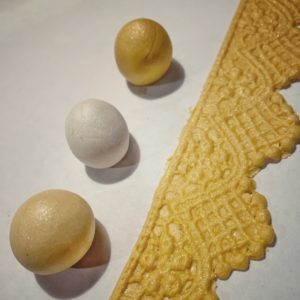
The consistency of this Shimmer Fondant is slightly different than regular fondant. When you knead the fondant, you can feel the glitter in it. However, it’s not gritty because the glitter crystals lay flat when you roll out the fondant. Another thing to note is this product tastes great and it feels the same in your mouth like regular fondant does.
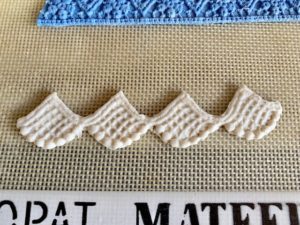
Looking at the photo above, you can see this fondant works great with any type of mold. You can see the details of the lace mold I used above. I had a bit of a hard time trying to make flower petals. If you want to make flowers with this product, you may want to mix in some regular fondant or gumpaste.
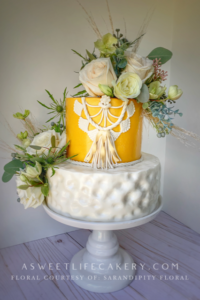
Inspiration for my Cake Design
When I received this new product I couldn’t help but think of the all the possibilities. For my cake design, I decided to go with a Boho Chic theme. Inspiration can come in many forms but I was inspired by Macrame Wall Hangings I saw on Amazon.

Boho Chic weddings is a huge trend in weddings these days. My sister, Sarah, of Sarandipity Floral collaborated with me on this project. She is such an amazing florist and knew exactly what I had in mind when I told her what I had in mind.
Supplies I used to create this care are as follows:
- Satin Ice Shimmer Fondant (Gold and Pearl)
- Satin Ice White Fondant
- Fondant Smoother
- Fondant Roller
- Fondant Extruder
- Cake Turntable
- Cake Pedestal
- Silicone Lace Mold
For this cake design, I baked cakes that were 6″ and 9″. I filled and iced both cakes and placed them in the refrigerator to firm up while I rolled out my fondant.
I panel wrapped both cakes with fondant as opposed to draping the fondant over the cakes.
Wrapping cakes as opposed to draping cakes in fondant has become my new favorite way of covering cakes with fondant. The reason I like to panel wrap cakes is because first, it’s just the easiest method when you have a large cake to cover with fondant. Second, when you wrap a cake as opposed to draping the fondant, you get really sharp edges.
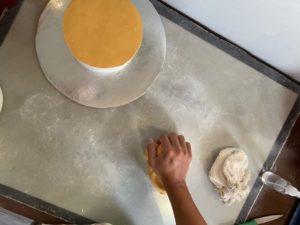
Once the cake is chilled, roll out fondant slightly larger than the top of your cake and place it on the top of your cake. Dust the top of the cake with a little cornstarch and flip it over carefully onto a clean board.
Using a sharp knife, trim the excess fondant exactly to the size of your cake.
Measure the circumference of your cake. This 6″ cake was 19″ around and 5″ in height. I rolled out my fondant to 19″ in length and 5 inches high. Dust the strip of fondant with cornstarch and roll it up using a fondant roller, a piece of pvc or a rolling pin.
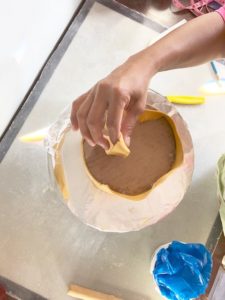
The Shimmer Fondant was excellent to roll out. I was able to roll the fondant out real thin and it didn’t tear at all.
You can see in this photo just how thin I was able to roll the fondant. After wrapping the cake while it was still upside down, I easily trimmed away the excess. Using a sharp blade I trimmed the excess fondant away while resting the blade on the board to ensure the edge was perfectly straight.
Once the cake was wrapped and trimmed, I flipped it over and repeated the same process with the next cake.
I used an extruder to make the rope on the sides of the cake and as a boarder between the two tiers.
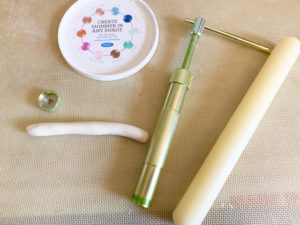
A fondant extruder is one of my favorite cake tools. The extruder comes with a good amount of discs to create things such as thin rope designs, grass, tassels, stripes. This is definitely one tool you’ll need in your tool kit. So if you don’t have one, click on the link on the supply list above to find out how you can snag one for yourself.
I used a silicone lace mold for part of the design elements on the side of the cake and trimmed out the pieces to suit my design.
It was such a fun experience to collaborate with Satin Ice on this project.
The new Shimmer Fondant is definitely a must have for creating a shimmery effect on cakes. If you are a cake designer, novice or professional, I definitely recommend this product. Even keeping a bucket on hand of the pearl may make your life easier when creating sugar art or cakes.
About The Author
admin
Related Posts

Best Donut Recipe Ever!
I did a little test baking this past weekend and made the Best Donut Recipe…
December 29, 2019
Creamed Spinach with Roasted Spaghetti Squash
It can be hard sometimes for families to come up with new and exciting recipes…
June 20, 2019
Leave A Comment